
Load, Stress, Spike, Soak Testing Using k6 in C#
Load, stress, spike, and soak testing falls under performance testing. The performance testing will help us to understand that how our system will perform under various conditions. Let’s discuss what each type of testing is and how to perform it using open source tool k6.
Load Testing
This type of testing simulates increased number of users (generally higher API calls). It helps to evaluate how our system will perform under normal and huge demand.
Stress Testing
The stress testing helps to decide the point where our system can fail. The goal is to identify limits of your system. We may not address the limits, but it’s good to have an idea about breaking point of your system. This is crucial to set the expectation and monitoring parameters.
Spike Testing
As it’s name suggest, this type of testing helps to evaluate how our system will perform if there is sudden and huge spike in requests. The spike may only last for short time, but it’s huge and system should be able to handle it.
Soak Testing
Soak testing involves running the system at a high load for an extended period. Some issues only surfaces when we run our system for certain length, this includes memory leaks or performance degradation etc. Basically, soak testing will help us to ensure that our system can handle load for longer duration.
How to perform these testings?
There are several open-source and paid tools available to conduct performance testing. In this article, we will see how we can use k6 (an open source tool) to perform the testing.
What is k6?
k6 is an open source performance testing tool developed by Grafana. The tool provides valuable insight related to performance and helps to mitigate the risk. The best part of k6 is that, you (as a developer, QA engineer or site reliability engineer) can leverage your existing knowledge of JavaScript to write scripts for testing. No new language to learn. Further, you can integrate performance tests in your CI/CD pipeline and set up pass/fail criteria to ensure reliability goals.
How to install k6?
k6 supports Mac, Linux and Windows platform and can be downloaded and install using traditional methods. For this article, we will discuss Windows installation.
You can either install k6 using https://chocolatey.org/ or by downloading MSI and installing it directly. Please refer installation page for more details.
You can download the sample project from my GitHub repo here.
Let’s quickly learn some K6 terminology before understanding the scripts.
VU (Virtual Users): This parameter helps to simulate number of users accessing our system/API in parallel mode. Meaning, if VUs value is 10 then 10 users are making simultaneous calls to your API.
Duration: The duration indicates how long the requests should last. So, let’s say we provide 10 as VUs and 30s as duration, it simulates 10 users simultaneously calling you API for 30 seconds.
Options: You can set default option for VUs and Duration.
To run the k6 tests:
- Make sure that your APIs are running.
- Execute
k6 run <script_name>.js. Let’s break each part.
-k6 run: This is the base command to start running a test with k6. Therunsubcommand tells k6 to execute the specified script.
-<script_name>.js: This is the name of the JavaScript file that contains the k6 test script.
Let’s say we have following script (basic-script.js):
//1. Required Init Code
import http from 'k6/http';
import { sleep } from 'k6';

//2. Optional Setup Code
export function setup() {
}

//3. Required VU Code
export default function () {
    http.get('https://localhost:7140/weatherforecast');
    sleep(1);
}

//4. Optional Teardown Code
export function teardown(data) {
}
The first part is refer as init code . Code in the init context prepares the script, loading files, importing modules, and defining the test lifecycle functions. This is required section. Here we are importing http and sleep modules of k6.
The second part is where we are setting up the test environment and generating data. This is optional section.
Next, we have is VU code and it runs in the default or scenario function, running for as long and as many times as the options define. This is required.
Last one is teardown section where code related to postprocessing data and closing the test environment runs. This is optional.
Throughout the test, k6 will collect performance metrics such as response times, error rates, and the number of requests per second.
Now, let’s run the basic script and to run execute following command form the command prompt. Make sure your API are running and you are in the script section of the command prompt (not at the root level).
k6 run basic-test.js
Understanding the Output
Above script will generate following output:
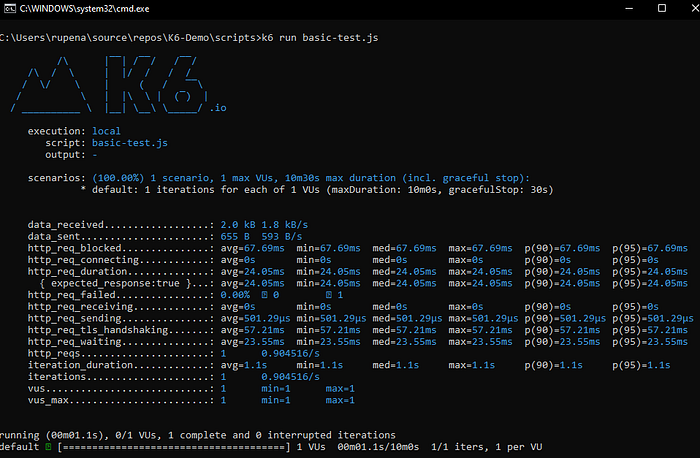
Observe the scenarios section, it means we have simulated one user making one request and maximum wait time is 10 min and 30 seconds.
The metrics also shows details of data sent/received, time it took to get response, any failure etc. It shows average, minimum (fastest by time), median, maximum (slowest by time) and average values of each parameter.
The p90 and p95 refers to percentile values. They provide a way to understand the spread and distribution of data. For example, p90 indicates that 90% of the requests (or other measurements) were completed faster than this value. (same for p95). For example, if the p90 value for response time is 300ms, it means 90% of all requests took less than 300ms to complete, while 10% took longer. They basically gives you insights into the performance experienced by the slowest requests — the worst case.
Above test was conducted assuming only one user is making a request. To simulate more users, we can use following command:
k6 run --vus 10 --duration 30s basic-test.jsThis indicates to simulate 10 users and each user is continually making requests for 30 seconds. Here is how the output will look like:
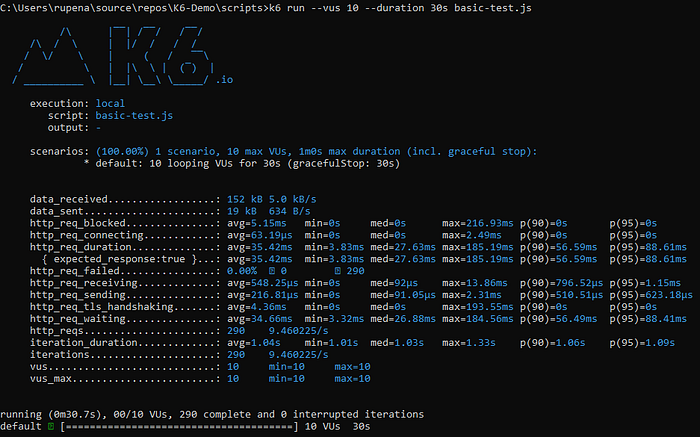
Observe the scenario. it says 10 VUs and 30 seconds. This is a very basic load testing command.
To perform stress testing use below script:
import http from 'k6/http';
import { sleep } from 'k6';

export const options = {
    stages: [
        { duration: '30s', target: 100 },
        { duration: '1m', target: 200 },
        { duration: '30s', target: 300 },
        { duration: '1m', target: 400 },
        { duration: '30s', target: 500 },
    ],
};

export default () => {
    http.get('https://localhost:7140/weatherforecast');
    sleep(1);
};
Here, we are gradually increasing the users from 100, to 500 and adjusting duration accordingly.
Spike Testing: You can use below script:
import http from 'k6/http';
import { sleep } from 'k6';

export const options = {
    // Key configurations for spike in this section
    stages: [
        { duration: '2m', target: 2000 }, // fast ramp-up to a high point
        { duration: '1m', target: 0 }, // quick ramp-down to 0 users
    ],
};

export default () => {
    http.get('https://localhost:7140/weatherforecast');
    sleep(1);
};
Soak Testing: Use below command for our basic script:
k6 run --vus 100 --duration 8h basic-script.jsIt’s simulating 100 users continuously calling our API for 8 hours.
Conclusion
k6 can help to test the reliability and performance of your application and infrastructure. It also helps engineering teams prevent errors and SLO breaches (service-level objective — agreements within a service-level agreement (SLA) that define metrics like uptime or response time to help IT and DevOps teams meet customer expectations), enabling them to build resilient and high-performing applications that scale.